How to Create an Alien Ecosystem
Part 3: Meshing Your Alien Ecosystem
Welcome back! In Part 2 we added taxonomic Orders to our alien ecosystem to give it more potential.
But animals don't exist in isolation. They have all sorts of relationships with one another including predator-and-prey, cooperative, commensalist (that's a relationship that benefits one side but neither helps nor harms the other), amensalist (where one individual is unaffected and the other is harmed), and parasitic. In this post I'm going to work out the relationships present in my ecosystem, and for that I'm going to use Lucidchart's excellent free service. I'll focus more on predator-and-prey, cooperative, and commensalist relationships, as amensalist and parasitic ones tend to involve invertebrates, which we are not focusing on in this tutorial.
Lucidchart is usually a service for creating flow-charts, but it happens to suit this process beautifully. This blog post is not sponsored by them, I just happened to find Lucidchart particularly helpful for this process.
But before I do any of that, I want to do two things:
- move the nonsensical or too-Earthlike alien Orders into another Class to see if they fit better there instead, and remove them entirely if they don't fit anywhere.
- add a couple more details to our animal Orders: number of limbs, and a rough idea of preferred climate. Limb number will help the end result look more alien, and preferred climate will help us make sense of the survival challenges each Order faces.
Moving and Removing Orders
Here's how I've decided to move things around:
Wabl'o poba
Herding animals (ungulates)
Insectivores
Primates
> Cassowaries and emus (includes ostriches, kiwi, and the extinct elephant bird)
Pheasants
Waders
Owls
Turtles
Sharks and rays
Toadfish
Having cassowaries, emus and similar birds in this section mainly means they'll be featherless but otherwise the same. I think they should get more interesting as we continue to add detail.
Cob'li po-fea
Carnivores
Hares and rabbits
Rodents
> Waders
> Owls
> Turtles
> Sharks and rays
Pigeons and doves
Penguins
Hornbills
Lizards and snakes
Anglerfish
Eels and morays
Live-bearing, cold-blooded waders and owls could be interesting, and I'd like to see what I can do with feathered turtles and sharks.
War'col begla
Whales, dolphins, and porpoises
Pouched animals
Cassowaries and emus (includes ostriches, kiwi, and the extinct elephant bird)
Cuckoos
Pelicans
Parrots
Frogs and toads
Seahorses and pipefish
Sardines and anchovies
Pogi'fula
Bats
Egg-laying mammals
Ducks
Nightjars
Vultures
Passerines
Tailed amphibians (salamanders)
Pufferfish and boxfish
O'fur-hai
Gliding tree mammals
Seals
Cranes
Raptors
Crocodilians
Hagfish and lampreys
Catfish
I don't see any spaces where penguins, egg-laying mammals, salamanders, and hagfish and lampreys fit in so I've taken them out of this process completely.
Limbs and Preferred Climate
I don't have too much of a reason for each number of limbs I've assigned here. I've mainly gone for a combination of six-limbed beasties for Rule of Cool, and assigned combinations of legs and fins reasonably randomly wherever I can, to give the finished creatures a more exotic look while trying to avoid causing myself too many problems (I mean, why would a bird-heavy group need fins?).
This is a good time to consider the solar system your world exists in and the pressures that it's under - how hot its star is, whether it's shaded from the sun for long periods of time, and all sorts of other details. I'll work on a blog post for that as soon as I can.
Anyway, for now let's assume a roughly Earth-like world and assign a number of limbs to each Class.
Wabl'o poba - 6 limbs
Herding animals (ungulates) - widespread
Insectivores - warm
Primates - widespread
Cassowaries and emus (includes ostriches, kiwi, and the extinct elephant bird) - cold
Pheasants - warm
Toadfish - warm
Cob'li po-fea - 2 legs, 4 fins
Carnivores - relatively widespread, prefers warm
Hares and rabbits - warm
Rodents - relatively widespread, prefers warm
Waders - relatively widespread, prefers warm
Owls - relatively widespread, prefers warm
Turtles - warm
Sharks and rays - warm
Pigeons and doves - relatively widespread, prefers warm
Hornbills - warm
Lizards and snakes - warm
Anglerfish - warm
Eels and morays - warm
War'col begla - 2 limbs
Whales, dolphins, and porpoises - widespread
Pouched animals - cold
Cuckoos - widespread
Pelicans - warm
Parrots - widespread
Frogs and toads - relatively widespread, prefers warm
Seahorses and pipefish - widespread
Sardines and anchovies - widespread
Pogi'fula - 4 limbs
Bats - warm
Ducks - widespread
Nightjars - cold
Vultures - widespread
Passerines - warm
Pufferfish and boxfish - cold
O'fur-hai - 2 limbs
Gliding tree mammals - warm, humid
Seals - warm, near water sources
Cranes - moderate, near water sources
Raptors - relatively widespread, near water sources, may bathe in victims' blood to get moisture onto skin (if you happen to come up with any random insights like this, by all means jot them down - they'll be great inspiration later!)
Crocodilians - moderate, near water sources
Catfish - warm and moderate, humid
Meshing Your Orders
I'd like to quickly mention the level we're working at. Usually it's species that will form relationships with one another, not whole Orders. As an example, honey badgers, a species of mustelid, and honey guide birds, a species of passerine, cooperate to locate and open bee hives to get access to honey and grubs; on the other hand, Wolverines (another species of mustelid) and yellow canaries (another species of passerine) don't cooperate. What we're going to do is create relationships between one Order and another, which we can later refer back to and assign to individual species.
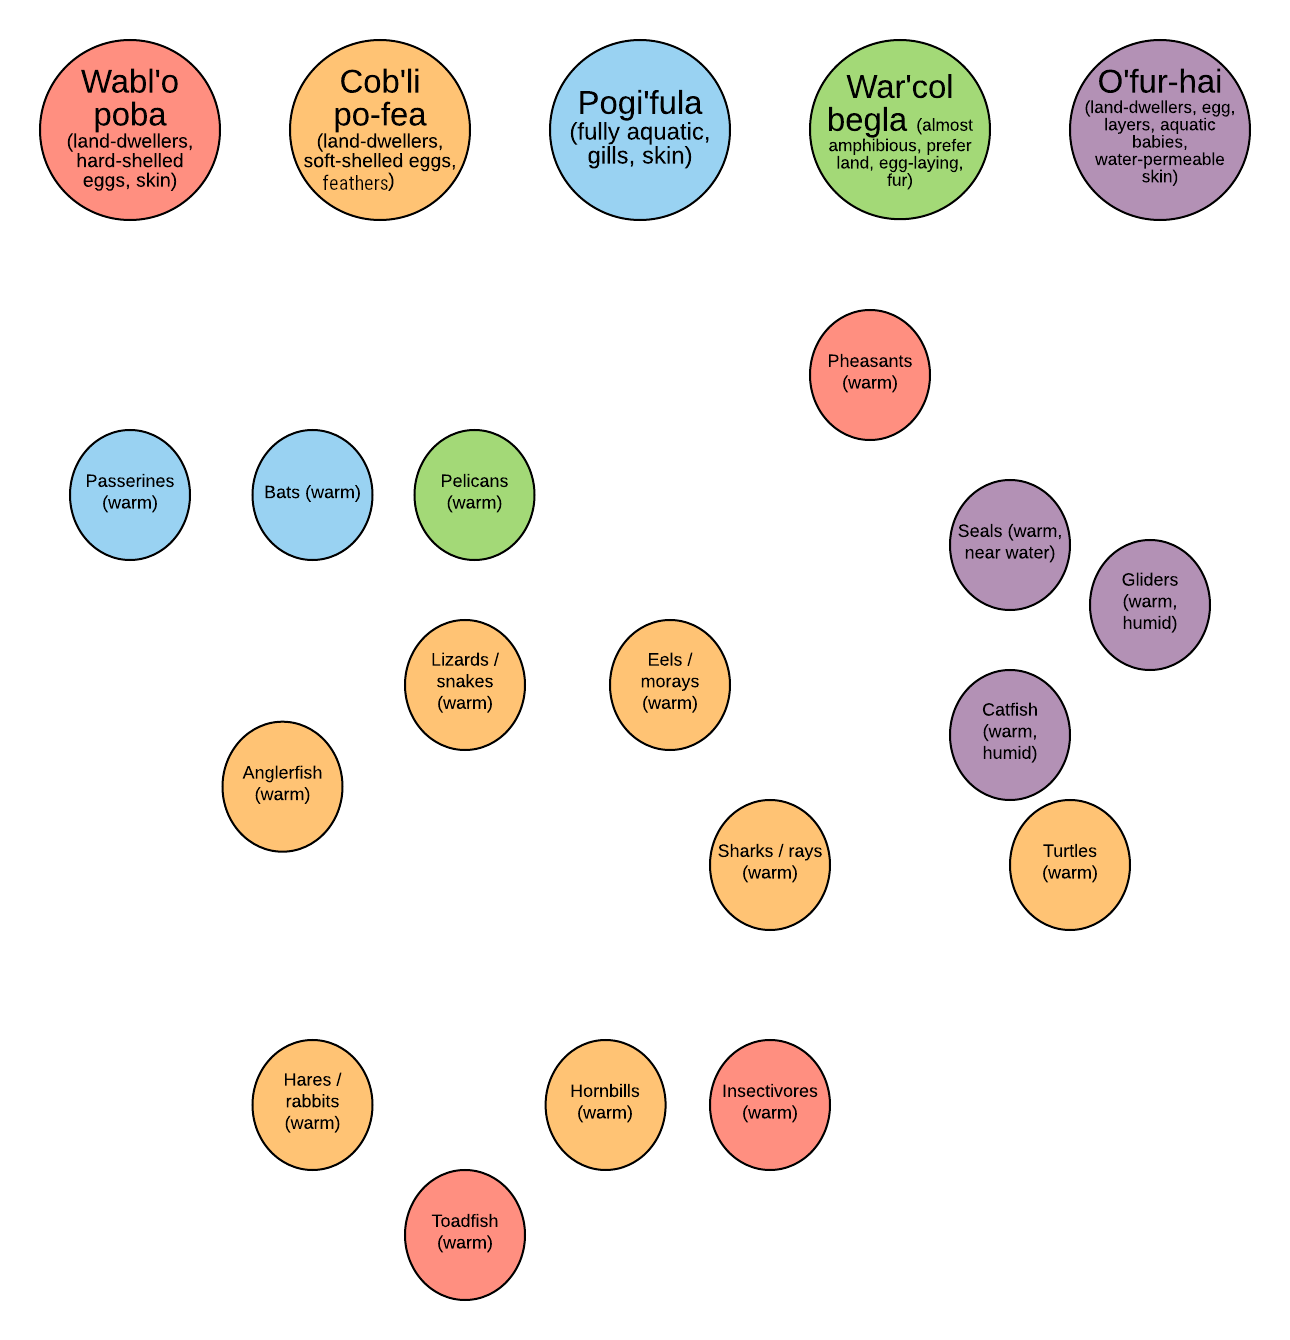
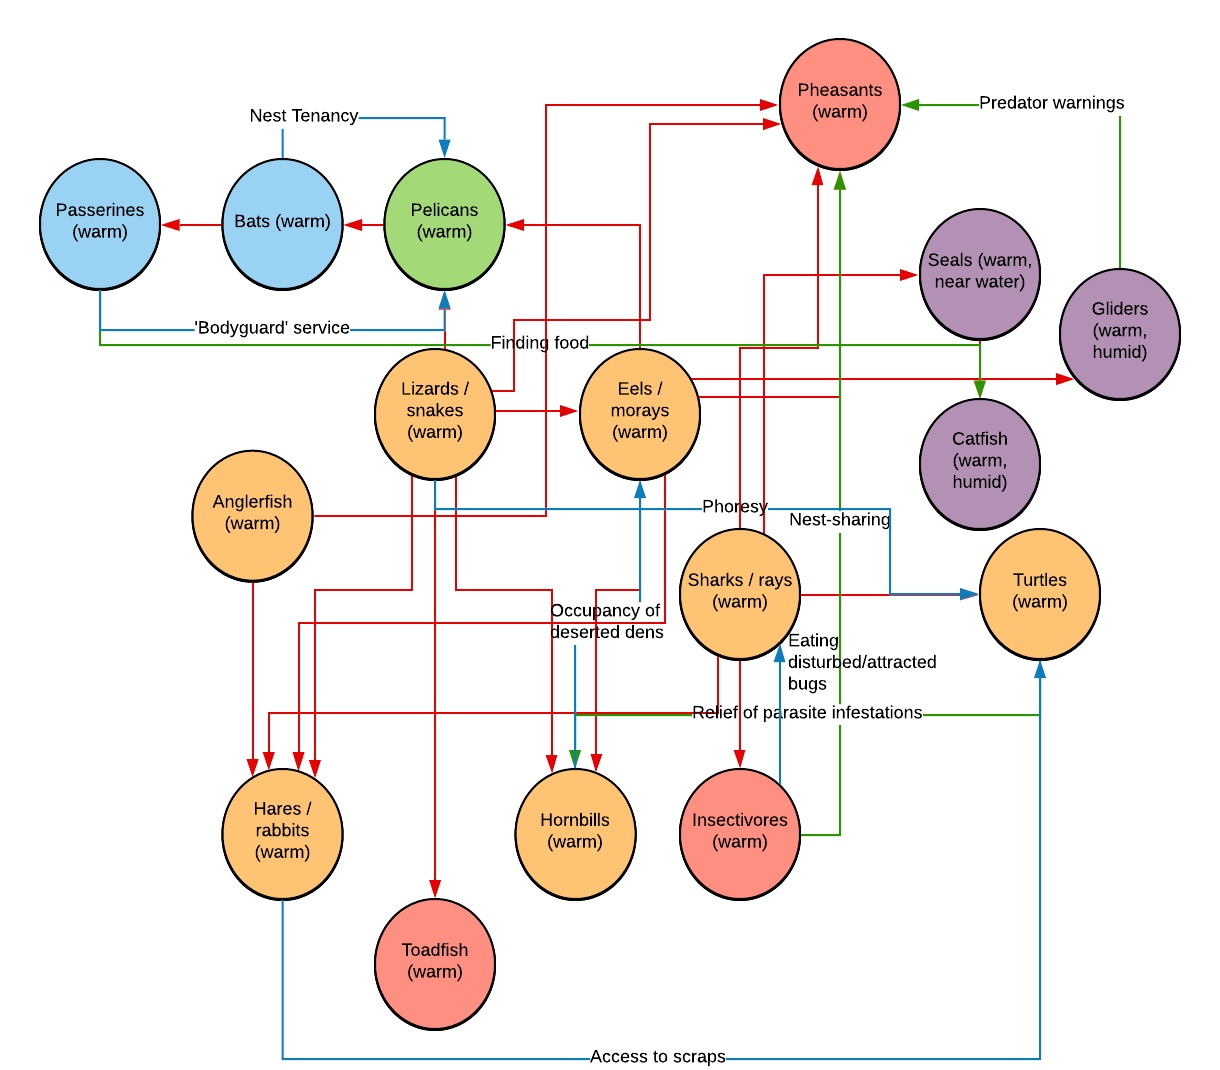
If you're following along and making your own ecosystem, open Lucidchart and create a circle for each of your Orders. Populate the chart with the inhabitants of only one climate at a time. Assign a colour to each Class, and then colour each Order according to the Class they belong to.
You may find it easier to miss out the widespread Orders for now. Lucidchart allows a maximum of 60 items on the sheet, including arrows, on their free service. If you want to create more detail on your chart than this allows, keep the Orders in exactly the same places, and when you're done assigning the first set of relationships, save the chart to your hard drive with a transparent background. This will allow you to make several sheets and layer them on top of one another to see all of the relationship arrows at once.
We're going to look at the Orders that prefer a warm climate. These creatures are clearly not the actual, named Orders any more (e.g., my 'seals' are no longer actual seals) but I'm going to keep their Earth names for now until after I've worked out the relationships between each creature. We'll look at naming your Orders, Families, and species in another post, and I mentioned my naming strategy for my Classes in part 1 of this series, which you're welcome to use.
Predator-Prey Relationships
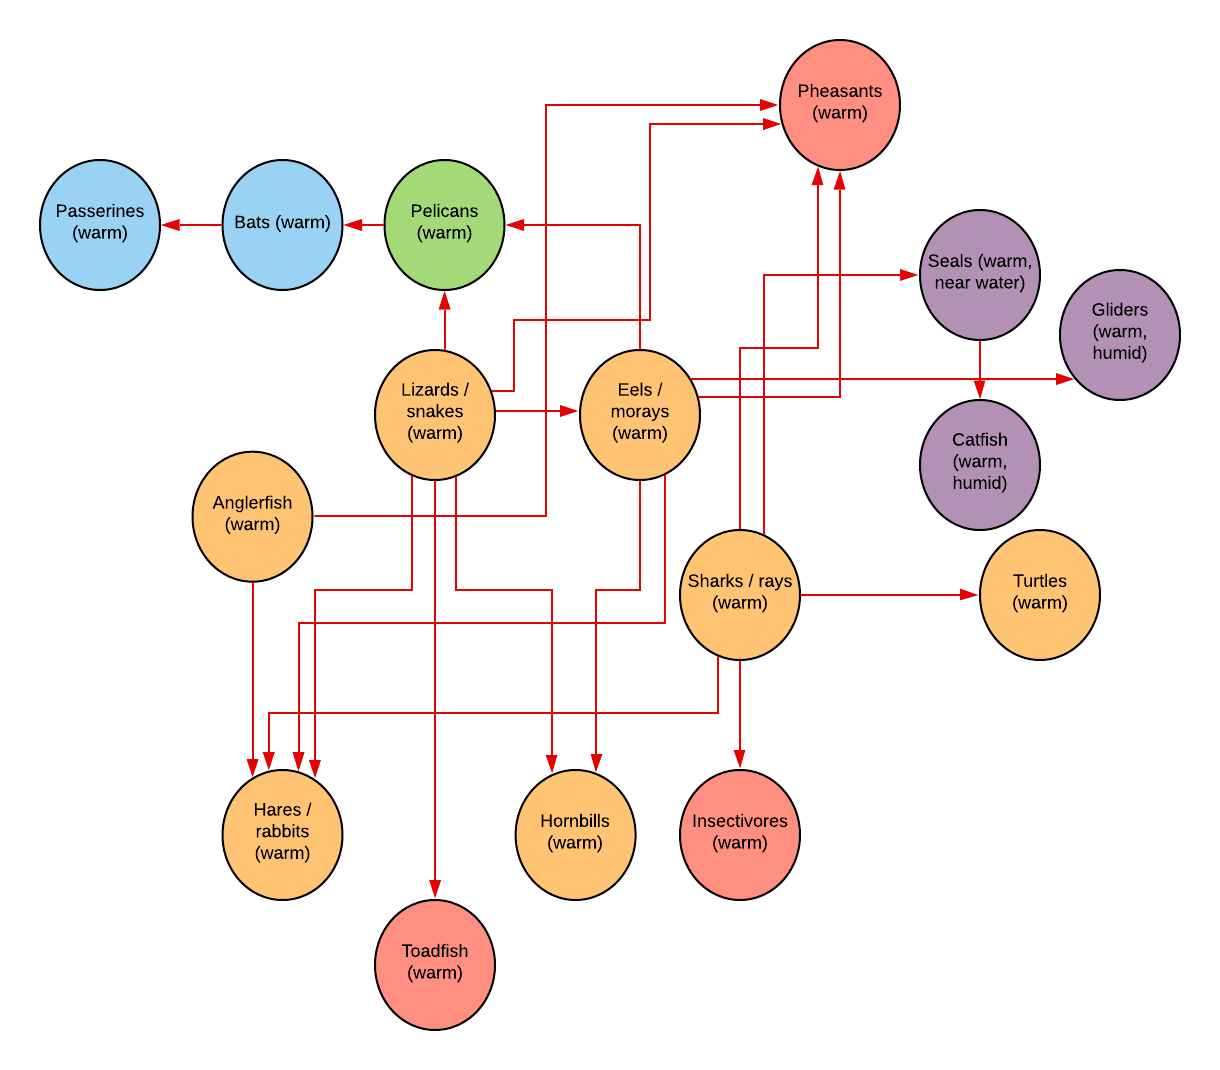
I made predator-prey connections between Orders that would likely have a predator-prey relationship, with the arrow pointing in the direction of predator > prey. Tip: species that live in the same kind of environment (e.g., land-based) are more likely to interact with each other simply because they're more easily accessible to each other. A mountain lion does not eat anglerfish because it never finds them.
Cooperative Relationships
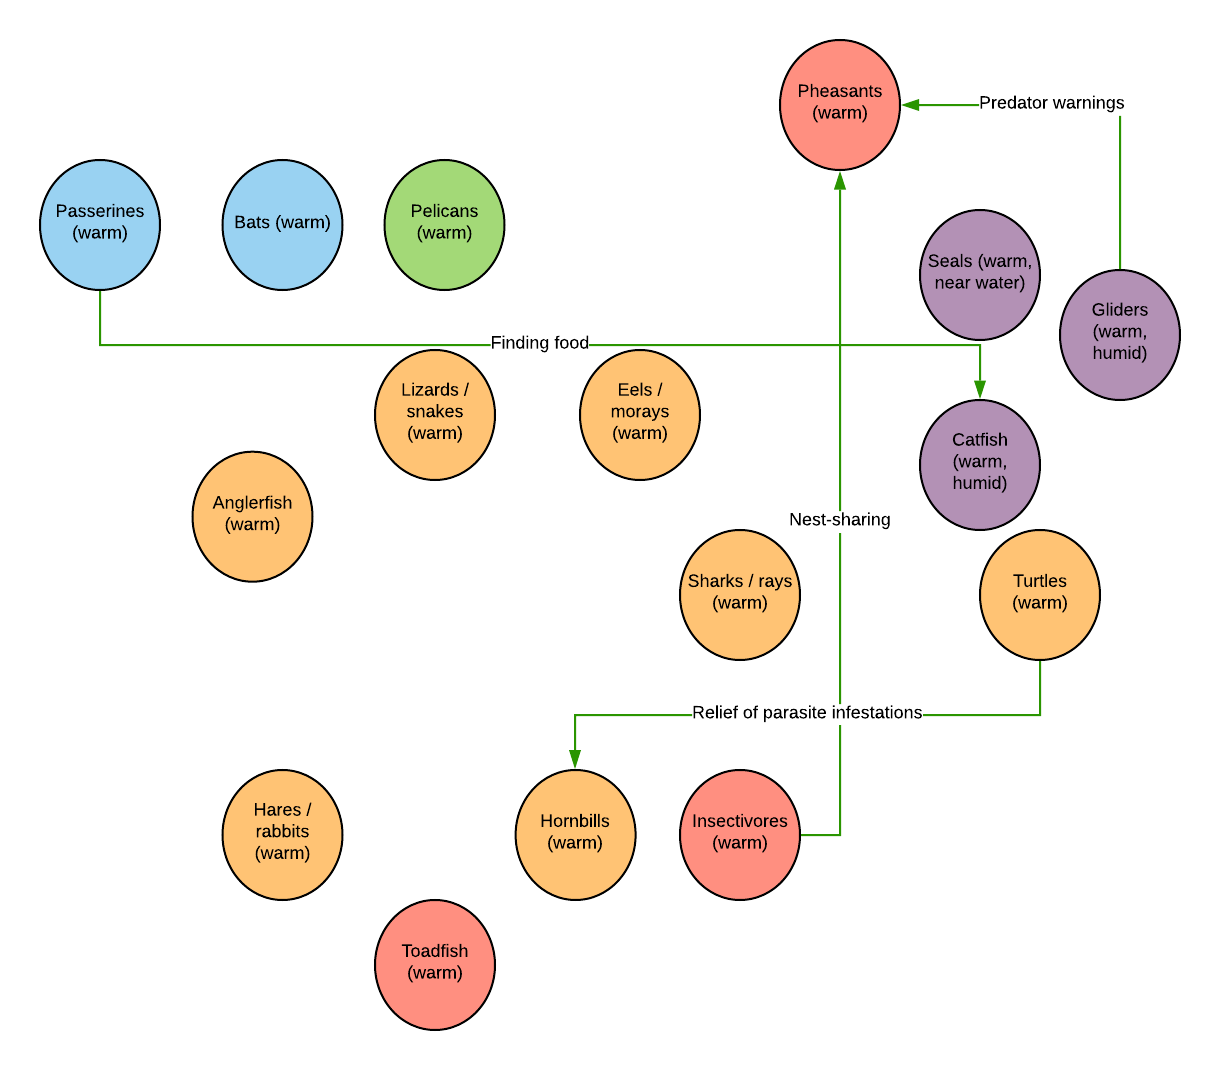
Now let's look at cooperative relationships, where both sides of the arrangement benefit. Green lines indicate pairs of species that cooperate, and because cooperation comes in so many guises, I've included comments to say how they help each other. Arrow directions are irrelevant here as cooperation is two-way.
Cooperative relationships are relatively common among vertebrates so it's well worth investing time into this part of your ecosystem. It also helps to break away from a pure predator-prey dynamic and add extra intrigue and warmth to your ecosystem.
One-Sided ('Commensalist') Relationships
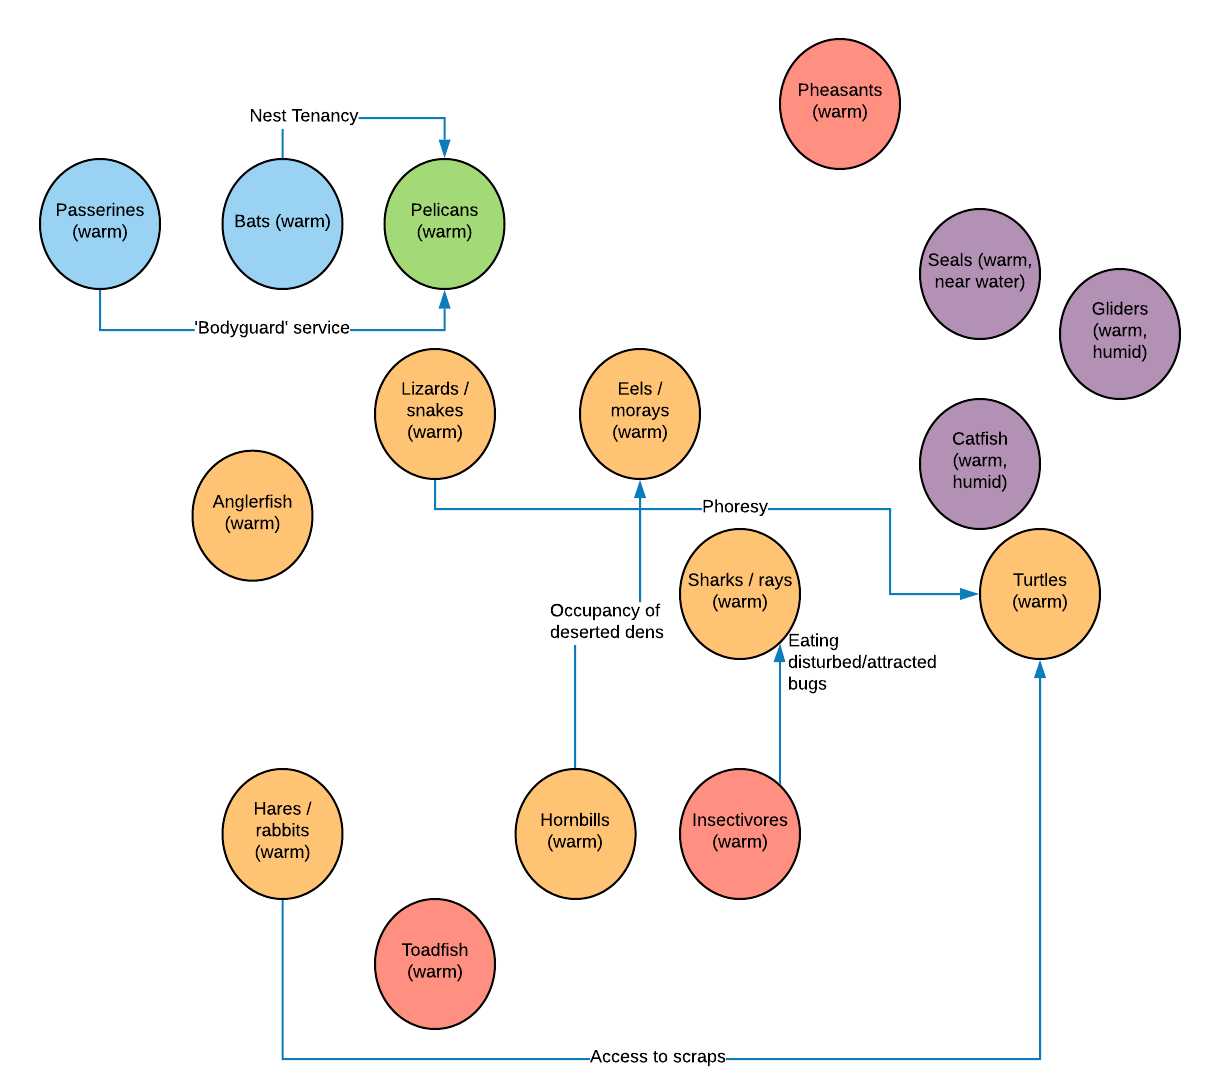
The third relationship style on our list is commensalism. As stated before, this is where one species is unaffected by its relationship with a second species, but the second species benefits. Here is an excellent list of examples of commensalism which you're welcome to use for reference. I used blue arrows for this one.
Other Relationship Styles
There are other relationship types, including amensalism (one individual is unaffected, the other is harmed), and parasitism, but these usually involve invertebrates and are rare among vertebrates, so I haven't focused on those for this ecosystem development tutorial. They're definitely worth looking into if you want alien insects or plants!
The Whole Network
If we layer all three relationship charts together, we get the relationship network you see on the left. Complex, isn't it? We can look at each layer separately whenever we want, but now that we've put it together we can see how wonderfully intricate it's become.
In part 4 we're going to use what we've learned here to write bios for our Orders, to firm up their details. That will help us to identify how they meet their main survival challenges and what they look like.
Want to keep up to date with our blog? Sign up to our newsletter.
Credits
Title image of and by MostlyWood, and used with their kind permission.
